Learn how to connect to your BitTitan account using our PowerShell module

In this blog post, we will teach you all you need to know, about connecting the BitTitan PowerShell to your BitTitan account. That is obviously the first step you need to do, before running your BitTitan scripts and automation.

BitTitan Environments

When you install and open our BitTitan PowerShell module, it’s default actions would be to send requests to our BitTitan.com platform, but although many of our customers don’t know, we also have dedicated BitTitan SaaS platforms in Germany and China.

To be able to change the environment you’re connecting to, you’ll have to leverage two cmdlets:

  • Set-MW_Environment – this changes the MigrationWiz environment and will cover any *-MW* cmdlets, corresponding to the migrationwiz.bittitan* website.
  • Set-BT_Environment – this changes the BitTitan environment and will cover any *-BT* cmdlets, corresponding to the manage.bittitan.* website.

You might need to use one or both of the cmdlets above, depending on the tasks you want to accomplish.

Common “*-MW*” tasks will include starting MigrationWiz migrations with the Add-MW_MailboxMigration cmdlet, or creating a MigrationWiz project with the Add-MW_MailboxConnector cmdlet, among many others.

Common “*-BT*” tasks will include listing your customers with the Get-BT_Customer cmdlet, or scheduling a DeploymentPro user with the Start-BT_DpUser cmdlet, among many others.

Although in out BitTitan cmdlet refererence page you will see many environments that can be set, the relevant externally available are the ones listed below, that apply for both BT and MW cmdlets:

Value Description
BT Represents BT
China Represents China
Germany Represents Germany

Based on the above, to change your PowerShell environment to Germany, after you open our PowerShell module, you would run the following:

Set-BT_Environment -Environment Germany
Set-MW_Environment -Environment Germany

Note that you can and should include those lines in your scripting, if it’s to run it consistently in those environments. Also, you can’t run commands in two different environments for MW or BT, in the same session. You would have to switch environments and to switch back to our .com platform, use the value BT.

The concept of ticket and how to create it

Once you ramp up your skills in our SDK, you’ll quickly learn that you can’t do anything with it without a ticket.

So what is a ticket?

A ticket in the BitTitan PowerShell module is an authentication token with several parameters, that you use each time you execute an action. The main parameters of the ticket are:

  • WorkgroupID – You can create a ticket specifically to a BitTitan Workgroup
  • IncludeSharedProjects – When set to true this is the parameter that allows you to see all projects and not just the ones you created. This parameter is exclusive for MW tickets
  • ExpirationDate – When the ticket expires. Tickets are by default valid for 1 week

How do I create a ticket?

You need to create 1 ticket specific for MW actions and 1 for BT actions, using the following cmdlets:

$MWTicket = Get-MW_Ticket -Credentials (Get-Credential)
$BTTicket = Get-BT_Ticket -Credentials (Get-Credential)

You can then leverage those tickets each time you run a cmdlet, for example:

Get-MW_Mailbox -Ticket $MWTicket

or

Get-BT_Workgroup -Ticket $BTTicket

Create a MigrationWiz ticket with project sharing

MigrationWiz enables collaboration. What that means is that either via the UI or PowerShell you can access and manage all objects within a workgroup, regardless if you created them or not.

Project sharing can be enabled or disabled. In the UI you have a checkbox for that, but with PowerShell what determines if you’re using project sharing is the way you create your ticket. We highly recommend that you use project sharing at all times, so now that you understand what a ticket is and how to create it, lets look at how to do it with the sharing enabled.

To create a ticket with project sharing you need to add 2 parameters to the cmdlet:

  • IncludeSharedProjects
  • WorkgroupId

And here’s the completed command:

$MWTicket = Get-MW_Ticket -Credentials (Get-Credential) -WorkgroupId [yourworkgroupid] -IncludeSharedProjects

You can obtain your workgroup id either by running the Get-BT-Workgroup cmdlet or by copying it from the URL in your browser, when you’re inside the workgroup.

BT tickets do not need project sharing, it only applies to MW tickets.

The bottom line

Hopefully the information above will help you understand in more detail how to connect and authenticate to the BitTitan systems, via the SDK, and all the options you have to incorporate in your scripts.
Ramp up your skills and start using the BitTitan Powershell

The purpose of this article is to provide you with the information you need to code with the BitTitan PowerShell module. We’re not going to teach you how to write a PowerShell script, code error handling, or build a loop. There are good resources online to help you develop those skills. If you’re familiar with PowerShell, you know there’s a learning curve for each new module. For example, you’ll want to learn how to connect and how to execute tasks such as creating or modifying objects. We want to help you get ahead of the curve so you can successfully build BitTitan SDK automation.

Here are resources that will help you ramp up your BitTitan PowerShell skills.

Cmdlet reference page

Once you’ve installed and started using the PowerShell module, you’ll want to check out our cmdlet reference page. This is where you’ll find all available cmdlets for the module, as well as some valuable examples of each parameter.

To give you an idea, if you need help defining items to be migrated with the Add-MW_MailboxMigration, click on the cmdlet in the left menu. Then, scroll down to ItemTypes where you’ll see a table of all available types.

GitHub script repository

In our GitHub repository you’ll find a variety of scripts, from simple scripts for basic tasks to elaborate scripts that execute complex migration workflows. Check it out here.

PowerShell blogs

We blog about our PowerShell module and scripting on GitHub. Check in often at  www.bittitan.com/blog/tips-and-tricks/ to see use cases for scripts or learn some coding with our SDK.

(this blog is a repost of the original blog that I wrote and published here)

Exchange Auditing, Calendar Logging and @MigrationWiz mailbox migrations with @BitTitan

Before you read this post, please have a look at this Microsoft article about the Recoverable Items Folder in Exchange Online.

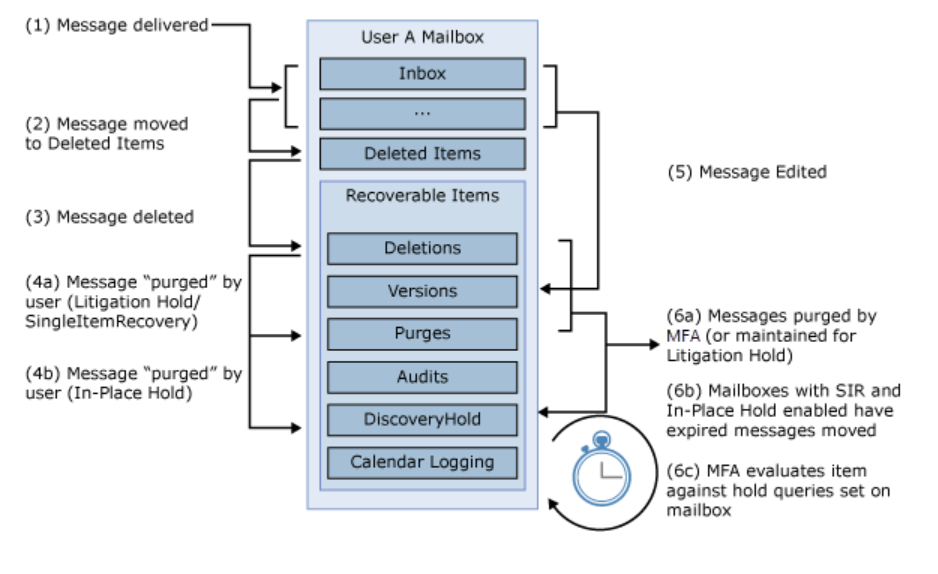
Two of the hidden folders you will find within the Recoverable Items, are there to log changes done to the mailbox:

  • Audits: If mailbox audit logging is enabled for a mailbox, this sub-folder contains the audit log entries. To learn more about mailbox audit logging, see Export mailbox audit logs in Exchange Online.
  • Calendar Logging: This sub-folder contains calendar changes that occur within a mailbox. This folder isn’t available to users.

Note: The folder “Versions” does keep track of multiple versions of a changed item, so in theory it also logs changes, but it’s not relevant for this post.

Dumpster01

Above you can see the structure of a mailbox and recoverable items.

So why is this important in the context of a migration?

When you leverage MigrationWiz to migrate mailboxes into a new Office 365 tenant, and because those tenants will have enabled by default both the Audit and the Calendar logging, the tool will create a lot of logs in those folders and in some extreme cases when the logs created are in a large number, it will slow down your migration.

It’s also important to state that the logs created on those folders are for the changes made by the migration tool. It logs what MigrationWiz changes in the process of the migration.

Dumpster02

The above is a warning thrown by MigrationWiz, stating that the folder “Audits”, in the recoverable deleted items, has more items than it should. Technically any folder in the recoverable deleted items can have up to 3 million items, but because MigrationWiz leverages EWS (Exchange Web Services), when the count goes over 100k items we will see and surface warning messages from Exchange.

Can you still create up to 3 million items? Yes, you should be able to, but the migration will slow down considerably.

Again, I want to stress that those items are probably in its majority the result of audit and calendar logging, and not necessarily items being migrated from the Audits source folder.

So how can we mitigate this?

Because the way to deal with Audit and Calendar logging is different, I am going to address it below, separately. Basically the solution, although applied separately and differently, is to disable Audit logging and/or disable Calendar logging, during the migration.

Before I proceed, and explain how you can do it, I have to state that both Audit and Calendar logging are security and compliance features in Exchange Online and on premises, so it’s ultimately up to you to decide if you should temporarily disable it or not. One thing that you should take into account, is if those mailboxes are being used by the end users or just for migration purposes? If it’s just migration purposes and if you are migrating mailboxes with very large item counts, then think of this as an option, since at that point there’s no end user actions to be logged.

Read more about Mailbox Audit logging in Exchange Server.

Microsoft doesn’t have a lot of official documentation on Calendar logging, but I’ll explain how you can disable it during the migration.

Mailbox Audit logs

There are several ways to disable Audit Logging in Exchange Online:

  • Disable Audit at the Organization Level
  • Disable Audit per mailbox

Read this article to understand how to Manage Mailbox auditing.

So let’s look at a mailbox without audit disabled:

AUdit1

As you can see above, the mailbox has audit enabled and is auditing all actions by admins, delegates and owner. We will not completely disable auditing in the mailbox, as it’s not needed. All we will do is disable Admin audit, since that is the only one that audits the impersonation access granted to MigrationWiz.

This is the recoverable items of the destination mailbox, before the migration:

Audit2

As you can see above, this being a brand new mailbox, the Audits folder is not even created.

And when migrating, we see the following:

Audit3

The count in the Audits folder went up to 6 items. Now lets see if that count matches what MigrationWiz migrated:

Audit4

Perfect match. So the bottom line here is that, as MigrationWiz copies the data into the destination mailbox, Exchange Online will Audit each action for each item as an Admin access to the destination mailbox. That can become a problem for mailboxes with hundreds of thousands of items, and a bigger problem when you are actually using MigrationWiz to move from recoverable items to recoverable items.

So now lets try the same migration but without Audit logging. Execute the following Exchange Management Shell cmdlet:

Set-Mailbox Peter.Smith -Auditadmin $null

Note: You might need to wait up to one hour (might take longer sometimes), after the changes are applied and before you migrate.

We will not completely disable auditing in the mailbox, as it’s not needed. All we will do is disable Admin audit, since that is the only one that audits the impersonation access granted to MigrationWiz.

Lets look at the results:

Audit9

I listed the entire mailbox just so you can see that the Inbox content was moved, but the Audits folder is still empty. Actually the Audits folder wasn’t even created because no audits were done and the mailbox is new.

Finally lets put the Auditing setting back to active. Don’t forget to re enable those settings, otherwise Admin auditing will stay disabled!

Execute the following Exchange Management Shell cmdlet:

Set-Mailbox Peter.Smith -DefaultAuditSet Delegate,Owner,Admin

To make sure the settings were applied you can run the command below:

Audit10

And that’s it regarding Audit logging. In summary, it’s up to you to run the migration with or without audit logging enabled for admin access, but in my opinion, temporarily disabling it during the migration might prevent some issues and be beneficial.

Calendar Logging

Exchange Online calendar logging will track changes of calendar items. Those changes will be stored in the recoverable deleted items, inside the “Calendar Logging” folder.

Just like with the Audits, when you are migrating data with MigrationWiz, in this specific case when you are migrating calendar items, the calendar logging folder can get a large volume of items, due to the logging feature being enabled.

The logic behind disabling it here is the exact same, and so are the reasons to consider it and decide if you want to do it or not.

Now lets look at how we disable calendar logging:

Audit5

As you can see above, there’s a property at the mailbox level named “CalendarVersionStoreDisabled“. By default that value is set to “False“. Lets see what happens when we migrate calendars with the option set like this:

Audit6

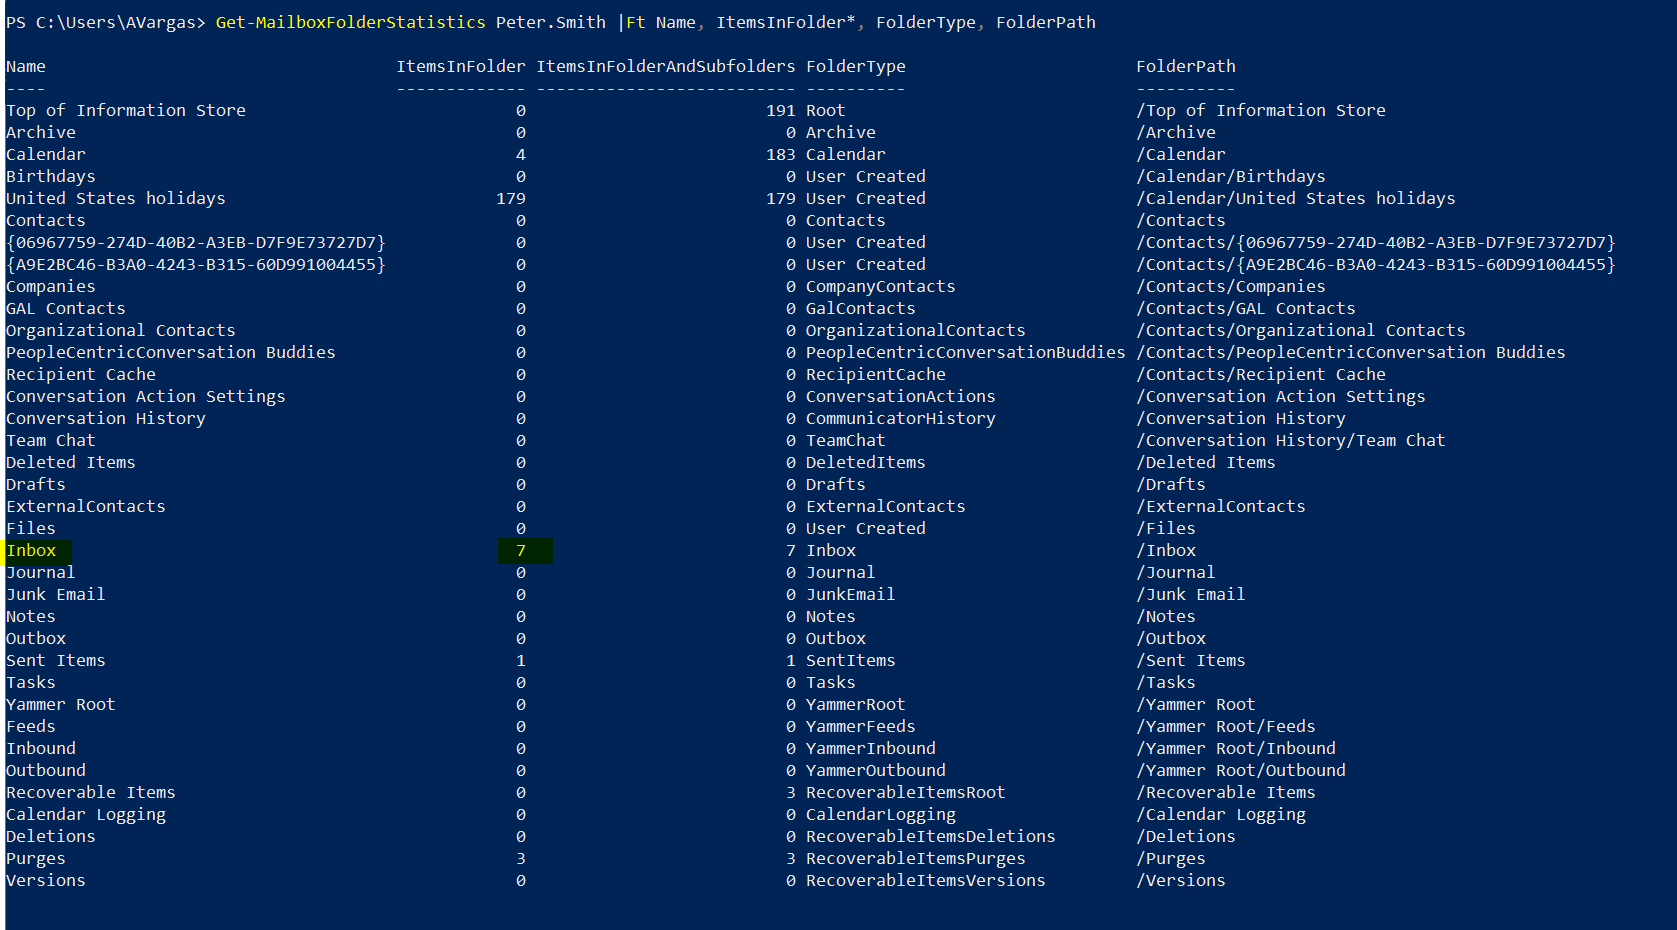
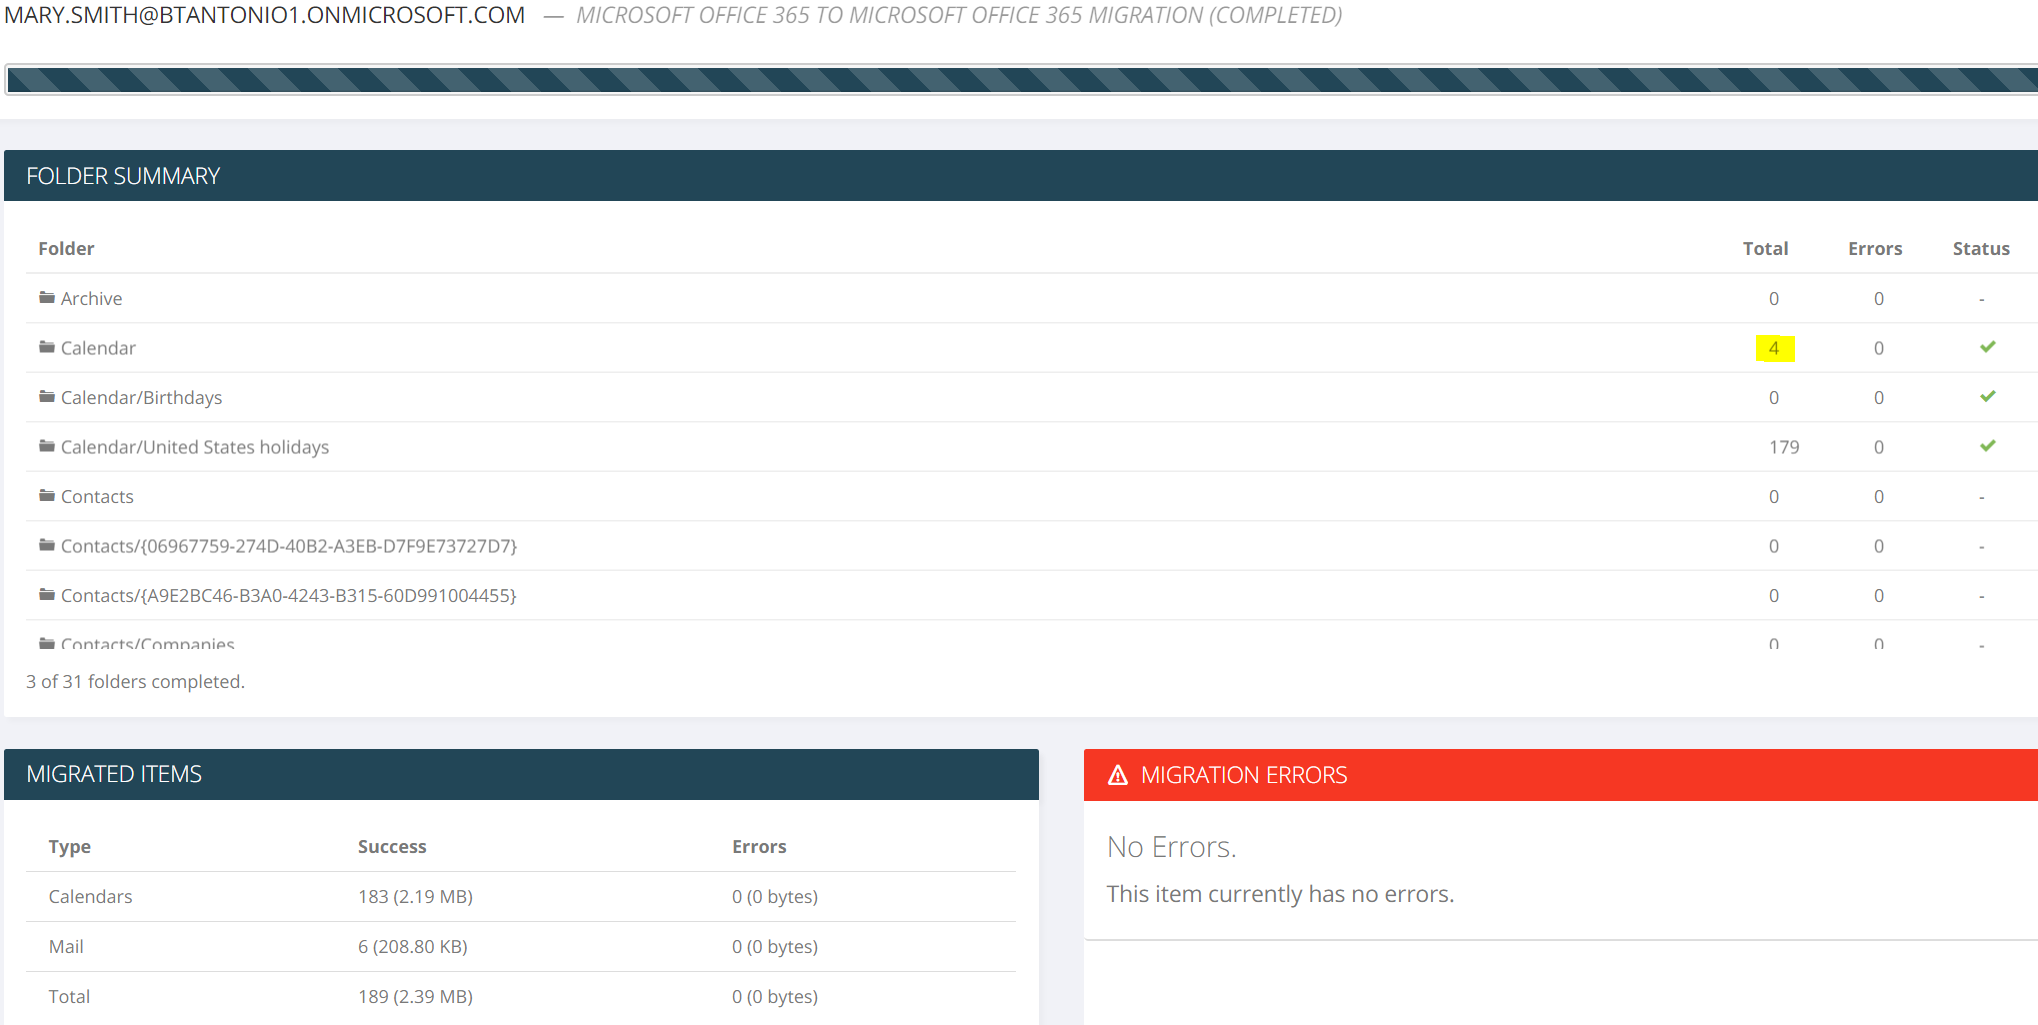
As you can see above the Calendar Logging is 7. Below you’ll see that the total number of calendar items migrated was 4. Depending on the meeting type (single, recurring, etc) the number of logged events in calendar might vary, and it’s not always 1 per event migrated.

Audit7

Again, above you can see in yellow the number of calendar events is 4. The default calendar (United States Holidays) migration does not get logged.

Now lets see how can we remove the logging. First start by running the command below:

Set-Mailbox Peter.Smith -CalendarVersionStoreDisabled $true

Note: You might need to wait up to one hour (might take longer sometimes), after the changes are applied and before you migrate.

Lets look at the destination mailbox after the migration, when logging is disabled:

Audit8

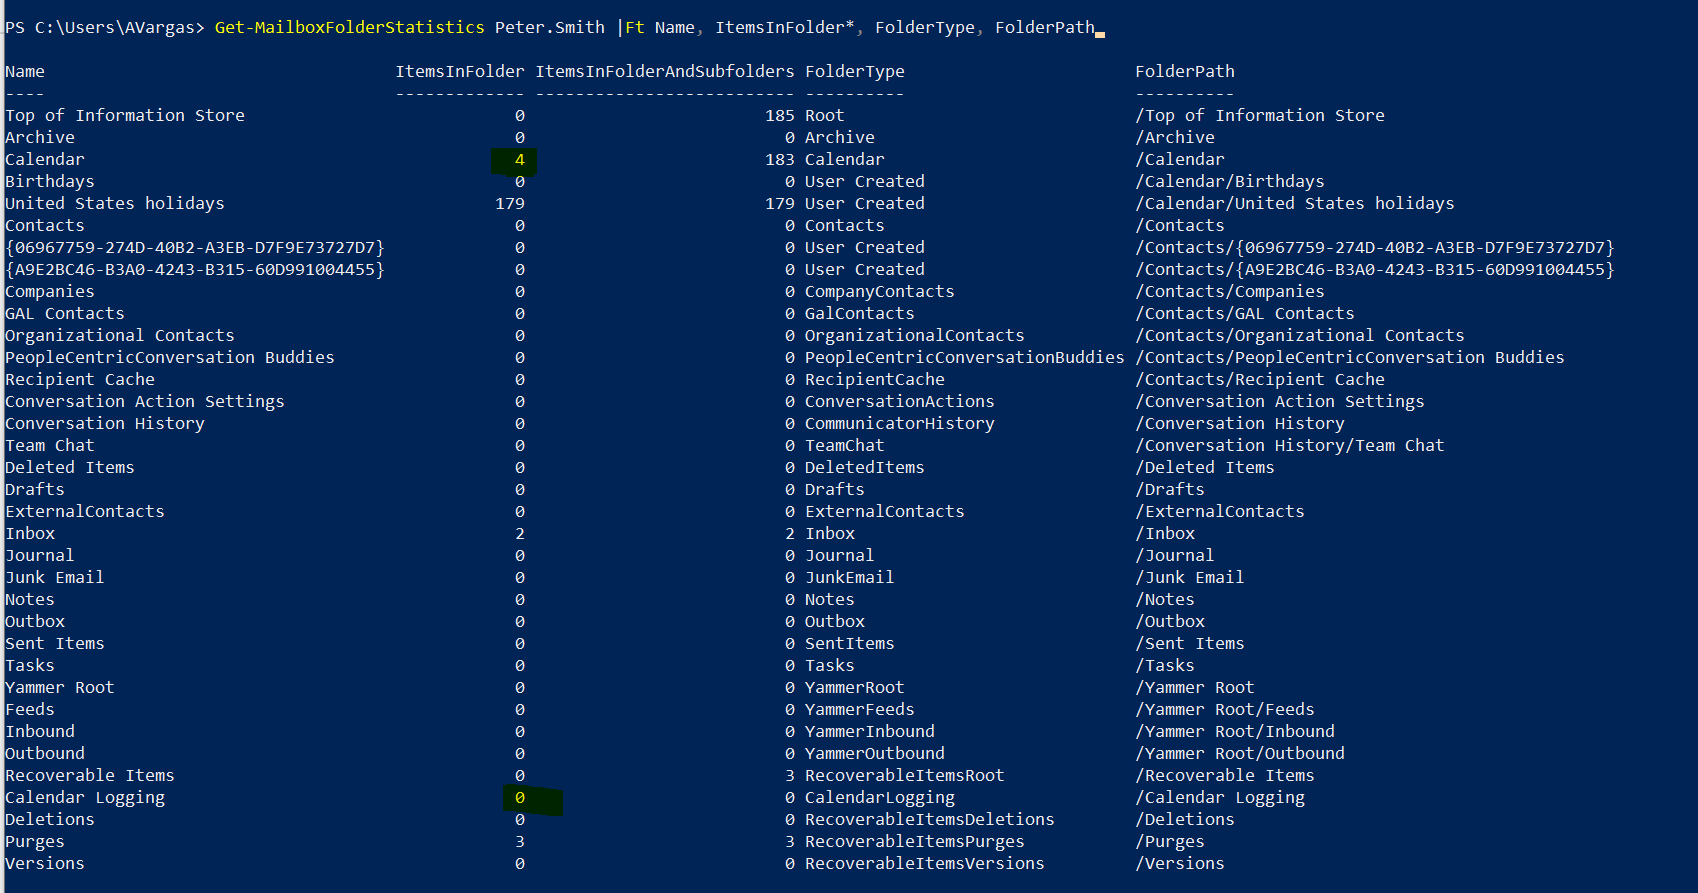
Above you’ll see that 4 calendar items got migrated but no Calendar logging was done.

Now how do you revert back the changes?

Set-Mailbox Peter.Smith -CalendarVersionStoreDisabled $false

Just set the value back to false. It’s very important to understand that those logging features should be enabled, so make sure you revert the changes done during migration.

The Calendar Logging done during migration is, just like for audits, even more problematic if you are migrating from recoverable items to recoverable items.

Bottom line

In this blog post we discussed how Auditing and Calendar logging in Exchange, might have an impact in your mailbox migration. It’s important to understand that those features are super important and should ideally be enabled, but consider the following:

  • do you really want to log 150 changes to calendar items in John’s mailbox when they were all done by a migration account in the context of a migration?
  • and how will that impact future log searches as part of a compliance process?
  • how about the 50000 audits of mailbox items being moved? do you need those, them being done in the context of a migration?
  • finally, if you’re migrating the recoverable items folder, you’re technically duplicating every audit log that exists in the source, because MigrationWiz will move the audit log entry and create a new one as part of auditing the move

The main reason for this blog post is to prepare you for some potential delays, if you are migrating large item counts with auditing enabled, but also to explain how you can disable it and, in my opinion, have a cleaner destination without a lot of logging that might not be as relevant.

Ultimately, it’s your decision to use this information as you see more fit for your organization.


How to use MigrationWiz to migrate Public Folder calendars into mailbox calendars

It’s very common to see, in Public Folder migrations, customers that want to migrate and transform that data. But how exactly is that done?

If you’re familiar with MigrationWiz, you’ll know that to migrate data all you have to do is follow some simple steps, like configuring access to source and destination, creating the migration project and defining, within the project, what’s the source and the destination.

The steps above are as simple as they sound, however, to transform data, you’ll need to do some advanced configurations. MigrationWiz gives you flexibility that probably no other tool does, by allowing you to filter or map (I’ll elaborate in a second), which are the foundation features to transform data, but to do so properly, you need to configure your project accordingly.

So how exactly should you configure a project, to migrate a Public Folder calendar into a mailbox calendar?

I won’t give you details about the basic steps to create a project, you can look for the migration guides in the BitTitan HelpCenter, but basically you need to create a normal Public Folder project and do some changes to it.

The first and more basic change you need to do is to set mailbox as a destination.

PFShare01

Within the advanced options of your MigrationWiz project, go to the Destination settings and select “Migrate to Shared Mailbox”.

Now that you have your destination defined, add the Calendar Public Folder that you want to migrate, to your MigrationWiz project, and the correspondent destination mailbox address.

PFShare02

So now that you have your 1:1 matching done in the project, can you migrate? The answer is no, but lets see what happens if you do.

PFShare03

What you are seeing above is the PowerShell output that lists all folders, after the migration, for the destination mailbox. So what happened?

Basically instead of putting all data into the default calendar folder at the destination, we created 2 new folders, of type IPF.Appointment (Calendar folders), in that mailbox.

What this means for the end user is that he will see 2 new calendars, “Folder1” that will be empty since it had no calendar data at the source and “MyCalendarFolder1” that will have all data. Additionally the default Calendar folder won’t have any migrated data.

The above is rarely the intended goal, so just migrating is usually not the solution. You’ll need some additional configurations. Lets get to it.

PFShare04

Edit the line item you added previously and in the Support options add a Folder mapping.

The regex in this folder mapping basically moves all source data to the destination folder called “Calendar”. Since the mapping is in place and it has a defined destination, we no longer create any folders in the destination. It’s also the mapping that makes all data be copied into that destination folder.

So with the configuration above all data will be into what eventually would be the folder you want. If you adjust the filter you can put it in whatever folder you want, having in mind that if the folder doesn’t exist we will create it.

Hope that helps and happy migrations!!


The value of the BitTitan SDK to your Enterprise migration project

For those of you with consulting experience, specially in Enterprise projects, currently working in the migration business as a consultant, or in other roles, you’ll know that there’s a huge difference between small/medium size projects and enterprise projects, specially in the way the project is executed.

It’s usually very easy to use a user interface of a tool, to perform actions for 10, 20 or 50 users, but when you have dozens or hundreds of thousands of users to migrate, that quickly becomes a challenge. In this post, we’ll discuss some of the key areas where, leveraging the BitTitan PowerShell module as a key element for task execution in your project, will bring a huge value.

Automate reoccurring tasks

In enterprise migration projects you’ll have hourly, daily or weekly tasks that you have to perform, such as:

  • start/restart migrations
  • create reports
  • move users between migration stages
  • retry failed migrations
  • add new batch of users to migration project
  • schedule the Outlook profile reconfiguration for a batch of users

During your project, most if not all of the tasks described above will have to be executed multiple times a week or even multiple times a day, depending on the task.

So why should you automate those tasks? The answer depends on the task, but reasons should include saving man hours, making sure tasks get executed on time, link task executions (i.e move a user to a different project and start another migration pass), etc

Create your own reports or integrate with an external reporting system

The BitTitan user interface provides you a whole variety of “out of the box” reports, such as user migration statistics, user devices details, etc. But from my experience there’s always one or multiple reports, that you or your customer needs and there’s no easy way of extracting that out of any user interface. With PowerShell you can extract any information and combine them in custom reports, that you can build to cover the exact needs you have.

As an example, if you want the total number of users across all project with migrations completed, running, failed, completed with errors or queued, the best way to get that is via the BitTitan PowerShell. You can filter in the user interface and you can also send to your email the project statistics CSV, but that is done per project and it doesn’t scale, specially if you have a large number of projects.

Another example is to get item counts and sizes of successfully migrated items for all users in all projects. Again in the case you can use the project statistics CSV sent via email, but that does not scale if you have 50 projects and need that report twice a day, does it?

You can also leverage the information provided by PowerShell to feed a reporting portal, from where you can monitor all major aspects of the migration (like the ones mentioned in the above examples), and that PowerShell can update in short intervals of time (i.e every 5 minutes). That gives you the ability to synthesize the information that you consider most relevant and make it available to the entire team executing the project, as well as of course keeping it up to date, without human interaction, instead of for example having to compile it and send it via email multiple times a day.

Multi platform task execution

In the scope of an Enterprise migration project, the “BitTitan tasks” are just part of the equation. There’s much more to do than just move the data and reconfigure the Outlook clients. That being said, it’s very common for consultants to build and use complex scripting for Enterprise level migrations, that leverage multiple SDKs and PowerShell modules. Some examples:

  • Leverage the MSOnline PowerShell module to create users and assign licenses in Office 365 and after the task is checked and being completed, leverage the BitTitan PowerShell to start the prestage migration for those users.
  • Stamp forwarding addresses, either via Exchange online or Exchange on premises PowerShell modules, before triggering the full migration pass with the BitTitan PowerShell.
  • Verify that the BitTitan migration is completed, via the BitTitan PowerShell, and convert mailboxes to mail users or remote mailboxes, once the completion status is marked as successful.

The three examples above, highlight some of the most common tasks that require multi-platform execution, but it can get much more complex than that. You can automate task precedence and execute much more than just two tasks, leveraging all available PowerShell modules

Trying to link those tasks via the user interfaces, with human interaction, is very challenging and time consuming. They will of course require access to multiple user interfaces and during the execution you can’t automate the task dependencies, which will make it prone to error.

Optimize execution of complex or lengthy tasks

We talked about the benefits of automating reoccurring tasks, about multi platform task execution, but it’s also very relevant to mention task optimization for very complex or lengthy tasks. This doesn’t need to be a reoccurring task nor it needs to be cross platform, all you need to consider when you plan to code a task to be done via PowerShell is, “Can I remove a lot of complexity and execution time, if I run this task via PowerShell?”. If the answer is yes then, code it.

Removing the complexity will allow you to have literally anyone executing that task, and not just a senior resource in your project.

Removing execution time is self explanatory: It saves you money and helps keep you within the estimated project timelines, since it’s easier to predict a task execution time when it’s scripted vs when it’s executed by a human.

Now to put this into context, let me give you some examples of complex or lengthy BitTitan tasks:

  • Retry errors to all illegible users in a project with 10k users
  • Schedule DeploymentPro for users with 5 different vanity domains
  • Start a migration for a list of users provided via CSV
  • Create 25 MigrationWiz projects, one per each user batch
  • Create 10 MigrationWiz endpoints for multiple admin accounts
  • Add 5k recipient mappings into a MigrationWiz project

To be honest all of the tasks described above are more lengthy than complex, since in my opinion there’s not a lot of complexity in the BitTitan tools, nevertheless you might not want to have some lower level resources executing them.

On the other hand, all of the tasks above take a significant amount of time to complete and scripting them will save you a lot of precious hours.

Proactive monitoring and task execution

The BitTitan user interface already has some monitoring tasks, such as send an email to the administrator when a migration fails, but with PowerShell you can take monitoring and proactive task execution to the next level.

Instead of just notifying the project executor that a migration failed, you can trigger another migration retry, but you can go to the detail of only doing it if the failure reason is not something like bad admin credentials. You can make it as clever as you want.

You can also chose not to have to check your email, to see if migrations failed, and just create a script that every 30 minutes checks for failed migrations, checks the reason for failure and if it’s worth retrying, starts another migration pass.

The sentence above explains why I think proactive monitoring and proactive task execution are tied together. Let that sync in, imagine a project with 75 thousand users and with around 5 thousand concurrent migrations being executed at any given point in time, and think about how proactive monitoring and task execution can not only save you hundreds of work hours, but also keep your project timelines within schedule. The last thing that you want, in a large and complex migration project, is to lose hours of migration time, where nothing is being migrated for anyone, because an error occurred and the resolution time is high.

Summary

So how do you, based on everything you read above, plan an execute an Enterprise migration project, with automation?

Use a tool that you can automate with:

When you’re choosing a tool for your Enterprise project, you should heavily consider one that has a powerful PowerShell module, like the BitTitan tools do. You can check the BitTitan PowerShell documentation here.

Prepare and test all of your automation:

Make sure you have all your scripts ready and tested. If you need helped coding with the BitTitan SDK please reach out to me directly or to the BitTitan support, that will forward you to the appropriate department that will provide the help that you need.

And that’s it.. I hope this post has been helpful and please reach out if you have any questions!


BitTitan SDK: Color code your MigrationWiz project users

The BitTitan SDK is a key feature for all Enterprise migration projects. Some tasks, in large migration projects, are better being automated. It will save you hundreds of hours of repetitive work.

Just recently I got asked by a partner for a way to easily execute actions in batches of users, within the same MigrationWiz project. Some times the best option is to divide those users into separate projects and just execute those actions for all the users, but that’s not always the best option.

Now imagine this scenario: You have a project with 10000 users and you need to start a migration to just 800 of them. What should you do? Color code those users, filter by that color and execute the action.

(More information about color coding here on the BitTitan help center)

So how can you categorize 800 users in a project with 10000? Using the BitTitan SDK, of course.

The script below, that you can also find here, can be used to automatically color code your MigrationWiz users, based on a CSV file.

Below there’s a sample of the CSV file. It’s needs two columns:

  • Source Email – the MigrationWiz source email address
  • Flags – A number between 1 and 6. Each has its individual color.

CSVCategories

The execution is as follows:

  1. Prompt to authenticate with BitTitan credentials
  2. Prompt you to select the BitTitan workgroup where the MigrationWiz project is
  3. Prompt you to select the BitTitan Customer where the MigrationWiz project is
  4. Prompt you to select the MigrationWiz project
  5. Enter the full path of the CSV file (i.e C:\scripts\MyUsers.csv)
<#

.DESCRIPTION

This script will move mailboxes from a mailbox project to a target project


.NOTES

    Author          Antonio Vargas

    Date         Jan/2019

    Disclaimer:     This script is provided 'AS IS'. No warrantee is provided either expressed or implied.

Version: 1.1

#>

### Function to create the working and log directories

Function Create-Working-Directory {

param

(

[CmdletBinding()]

[parameter(Mandatory=$true)] [string]$workingDir,

[parameter(Mandatory=$true)] [string]$logDir

)

if ( !(Test-Path-Path $workingDir)) {

        try {

            $suppressOutput = New-Item -ItemType Directory -Path $workingDir -Force -ErrorAction Stop

$msg="SUCCESS: Folder '$($workingDir)' for CSV files has been created."

Write-Host-ForegroundColor Green $msg

        }

        catch {

$msg="ERROR: Failed to create '$workingDir'. Script will abort."

Write-Host-ForegroundColor Red $msg

Exit

        }

}

if ( !(Test-Path-Path $logDir)) {

try {

$suppressOutput=New-Item-ItemType Directory -Path $logDir-Force -ErrorAction Stop

$msg="SUCCESS: Folder '$($logDir)' for log files has been created."

Write-Host-ForegroundColor Green $msg

}

catch {

$msg="ERROR: Failed to create log directory '$($logDir)'. Script will abort."

Write-Host-ForegroundColor Red $msg

Exit

}

}

}

### Function to write information to the Log File

Function Log-Write

{

param

(

[Parameter(Mandatory=$true)] [string]$Message

)

$lineItem="[$(Get-Date-Format "dd-MMM-yyyy HH:mm:ss") | PID:$($pid) | $($env:username) ] "+$Message

    Add-Content -Path $logFile -Value $lineItem

}

### Function to display the workgroups created by the user

Function Select-MSPC_Workgroup {

#######################################

# Display all mailbox workgroups

#######################################

$workgroupPageSize=100

  $workgroupOffSet = 0

    $workgroups = $null

Write-Host

Write-Host-Object "INFO: Retrieving MSPC workgroups ..."

do

{

$workgroupsPage=@(Get-BT_Workgroup-PageOffset $workgroupOffSet-PageSize $workgroupPageSize)


if($workgroupsPage) {

$workgroups+=@($workgroupsPage)

foreach($Workgroupin$workgroupsPage) {

Write-Progress-Activity ("Retrieving workgroups ("+$workgroups.Length+")") -Status $Workgroup.Id

}

$workgroupOffset+=$workgroupPageSize

}

} while($workgroupsPage)

if($workgroups-ne$null-and$workgroups.Length-ge1) {

Write-Host-ForegroundColor Green -Object ("SUCCESS: "+$workgroups.Length.ToString() +" Workgroup(s) found.")

}

else {

Write-Host-ForegroundColor Red -Object "INFO: No workgroups found."

Exit

}

#######################################

# Prompt for the mailbox Workgroup

#######################################

if($workgroups-ne$null)

{

Write-Host-ForegroundColor Yellow -Object "ACTION: Select a Workgroup:"

Write-Host-ForegroundColor Gray -Object "INFO: your default workgroup has no name, only Id."

for ($i=0; $i-lt$workgroups.Length; $i++)

{

$Workgroup=$workgroups[$i]

if($Workgroup.Name-eq$null) {

Write-Host-Object $i,"-",$Workgroup.Id

}

else {

Write-Host-Object $i,"-",$Workgroup.Name

}

}

Write-Host-Object "x - Exit"

Write-Host

do

{

if($workgroups.count-eq1) {

$result=Read-Host-Prompt ("Select 0 or x")

}

else {

$result=Read-Host-Prompt ("Select 0-"+ ($workgroups.Length-1) +", or x")

}


if($result-eq"x")

{

Exit

}

if(($result-match"^\d+$") -and ([int]$result-ge0) -and ([int]$result-lt$workgroups.Length))

{

$Workgroup=$workgroups[$result]

Return$Workgroup.Id

}

}

while($true)

}

}

### Function to display all customers

Function Select-MSPC_Customer {

param

(

[parameter(Mandatory=$true)] [String]$WorkgroupId

)

#######################################

# Display all mailbox customers

#######################################

$customerPageSize=100

  $customerOffSet = 0

    $customers = $null

Write-Host

Write-Host-Object "INFO: Retrieving MSPC customers ..."

do

{

$customersPage=@(Get-BT_Customer-WorkgroupId $WorkgroupId-IsDeleted False -IsArchived False -PageOffset $customerOffSet-PageSize $customerPageSize)


if($customersPage) {

$customers+=@($customersPage)

foreach($customerin$customersPage) {

Write-Progress-Activity ("Retrieving customers ("+$customers.Length+")") -Status $customer.CompanyName

}

$customerOffset+=$customerPageSize

}

} while($customersPage)

if($customers-ne$null-and$customers.Length-ge1) {

Write-Host-ForegroundColor Green -Object ("SUCCESS: "+$customers.Length.ToString() +" customer(s) found.")

}

else {

Write-Host-ForegroundColor Red -Object "INFO: No customers found."

Exit

}

#######################################

# {Prompt for the mailbox customer

#######################################

if($customers-ne$null)

{

Write-Host-ForegroundColor Yellow -Object "ACTION: Select a customer:"

for ($i=0; $i-lt$customers.Length; $i++)

{

$customer=$customers[$i]

Write-Host-Object $i,"-",$customer.CompanyName

}

Write-Host-Object "x - Exit"

Write-Host

do

{

if($customers.count-eq1) {

$result=Read-Host-Prompt ("Select 0 or x")

}

else {

$result=Read-Host-Prompt ("Select 0-"+ ($customers.Length-1) +", or x")

}

if($result-eq"x")

{

Exit

}

if(($result-match"^\d+$") -and ([int]$result-ge0) -and ([int]$result-lt$customers.Length))

{

$customer=$customers[$result]

Return$Customer.OrganizationId

}

}

while($true)

}

}

### Function to display all mailbox connectors

Function Select-MW_Connector {

param

(

[parameter(Mandatory=$true)] [guid]$customerId

)

#######################################

# Display all mailbox connectors

#######################################


$connectorPageSize=100

  $connectorOffSet = 0

    $connectors = $null

Write-Host

Write-Host-Object "INFO: Retrieving mailbox connectors ..."


do

{

$connectorsPage=@(Get-MW_MailboxConnector-ticket $global:mwTicket-OrganizationId $customerId-PageOffset $connectorOffSet-PageSize $connectorPageSize)


if($connectorsPage) {

$connectors+=@($connectorsPage)

foreach($connectorin$connectorsPage) {

Write-Progress-Activity ("Retrieving connectors ("+$connectors.Length+")") -Status $connector.Name

}

$connectorOffset+=$connectorPageSize

}

} while($connectorsPage)

if($connectors-ne$null-and$connectors.Length-ge1) {

Write-Host-ForegroundColor Green -Object ("SUCCESS: "+$connectors.Length.ToString() +" mailbox connector(s) found.")

}

else {

Write-Host-ForegroundColor Red -Object "INFO: No mailbox connectors found."

Exit

}

#######################################

# {Prompt for the mailbox connector

#######################################

if($connectors-ne$null)

{


for ($i=0; $i-lt$connectors.Length; $i++)

{

$connector=$connectors[$i]

Write-Host-Object $i,"-",$connector.Name

}

Write-Host-Object "x - Exit"

Write-Host

Write-Host-ForegroundColor Yellow -Object "ACTION: Select the source mailbox connector:"

do

{

$result=Read-Host-Prompt ("Select 0-"+ ($connectors.Length-1) +" o x")

if($result-eq"x")

{

Exit

}

if(($result-match"^\d+$") -and ([int]$result-ge0) -and ([int]$result-lt$connectors.Length))

{

$global:connector=$connectors[$result]

Break

}

}

while($true)

}

}

Function Add-MW_Category {

param

(

[parameter(Mandatory=$true)] [Object]$Connector

)

# add items to a MigrationWiz project

$count=0

Write-Host

Write-Host-Object ("Aplying categories to migration item(s) in the MigrationWiz project "+$connector.Name)

    $importFilename = (Read-Host -prompt "Enter the full path to CSV import file")

    # read csv file

    $users = Import-Csv -Path $importFilename

    foreach($user in $users)

    {

     $sourceEmail = $user.'Source Email'

$flags=$user.'Flags'

        if($sourceEmail -ne $null -and $sourceEmail -ne "" -and $flags -in 1..6)

        {

$count++

Write-Progress-Activity ("Applying category to migration item ("+$count+")") -Status $sourceEmail

$mbx=get-mw_mailbox-ticket $mwTicket-ExportEmailAddress $sourceEmail

if ($mbx)

{

$Category=";tag-"+$flags+";"

$result=Set-MW_Mailbox-Ticket $mwTicket-ConnectorId $connector.Id-mailbox $mbx-Categories $Category

}

else

{

Write-Host"Cannot find MigrationWiz line item with source address: '$($sourceEmail)'"-ForegroundColor Yellow

}

}

else {

Write-Host"The line item with the address '$($sourceEmail)' and the flag '$($flags)' is not valid."-ForegroundColor Yellow

}

    }


if($count-eq1)

{

Write-Host-Object "1 mailbox has been categorized in",$connector.Name-ForegroundColor Green

}

if($count-ge2)

{

Write-Host-Object $count," mailboxes have been categorized in",$connector.Name-ForegroundColor Green

}

}

#######################################################################################################################

# MAIN PROGRAM

#######################################################################################################################

#Working Directory

$workingDir = "C:\scripts"

#Logs directory

$logDirName = "LOGS"

$logDir = "$workingDir\$logDirName"

#Log file

$logFileName = "$(Get-Date -Format yyyyMMdd)_Move-MW_Mailboxes.log"

$logFile = "$logDir\$logFileName"

Create-Working-Directory -workingDir $workingDir -logDir $logDir

$msg = "++++++++++++++++++++++++++++++++++++++++ SCRIPT STARTED ++++++++++++++++++++++++++++++++++++++++"

Log-Write -Message $msg

# Authenticate

$creds = Get-Credential -Message "Enter BitTitan credentials"

try {

# Get a ticket and set it as default

$ticket=Get-BT_Ticket-Credentials $creds-ServiceType BitTitan -SetDefault

# Get a MW ticket

$global:mwTicket=Get-MW_Ticket-Credentials $creds

} catch {

$msg="ERROR: Failed to create ticket."

Write-Host-ForegroundColor Red $msg

Log-Write -Message $msg

Write-Host-ForegroundColor Red $_.Exception.Message

Log-Write -Message $_.Exception.Message

Exit

}

#Select workgroup

$WorkgroupId = Select-MSPC_WorkGroup

#Select customer

$customerId = Select-MSPC_Customer -Workgroup $WorkgroupId

#Select connector

Select-MW_Connector-customerId $customerId

$result = Add-MW_Category -Connector $connector

$msg = "++++++++++++++++++++++++++++++++++++++++ SCRIPT FINISHED ++++++++++++++++++++++++++++++++++++++++`n"

Log-Write -Message $msg

##END SCRIPT
This is the link for my GitHub Gist, where all comments are welcomed regarding the code. Use the comment section as well if you want something changed.
You can find all my BitTitan SDK scripts in my GitHub repository.

BitTitan SDK: Retry individual errors for all users in your MigrationWiz document migration project

The BitTitan SDK is a key feature for all Enterprise migration projects. Some tasks, in large migration projects, are better being automated. It will save you hundreds of hours of repetitive work.

The script below, that you can also find in here, can be used to automatically retry errors in all users of your MigrationWiz project.

To retry errors in a user, he needs to:

  • Be in a “Completed” state
  • have at least one item error

The execution is as follows:

  1. Prompt to authenticate with BitTitan credentials
  2. Prompt you to select your MigrationWiz document project
  3. Identifies number of users eligible for a retry errors pass
  4. Exports to a CSV, created in the same folder from where the script was executed, a list of all successfully initiated retry errors passes
<#


.DESCRIPTION

This script needs to be run on the BitTitan Command Shell


.NOTES

.Version        1.0

    Author          Antonio Vargas

    Date            Feb/13/2019

Disclaimer: This script is provided ‘AS IS’. No warrantee is provided either expresses or implied.

    Change Log

#>

######################################################################################################################################################

# Main Program

######################################################################################################################################################

$connectors = $null

#Working Directory

$global:workingDir = [environment]::getfolderpath("desktop")

#######################################

# Authenticate to MigrationWiz

#######################################

$creds = $host.ui.PromptForCredential("BitTitan Credentials", "Enter your BitTitan user name and password", "", "")

try {

$mwTicket=Get-MW_Ticket-Credentials $creds

} catch {

write-host"Error: Cannot create MigrationWiz Ticket. Error details: $($Error[0].Exception.Message)"-ForegroundColor Red

}

#######################################

# Display all document connectors

#######################################

Write-Host

Write-Host -Object "Retrieving Document connectors ..."

Try{

$connectors=get-mw_mailboxconnector-Ticket $mwTicket-RetrieveAll -ProjectType Storage -ErrorAction Stop

}

Catch{

Write-Host-ForegroundColor Red -Object "ERROR: Cannot retrieve document projects."

Exit

}

if($connectors -ne $null -and $connectors.Length -ge 1) {

Write-Host-ForegroundColor Green -Object ("SUCCESS: "+$connectors.Length.ToString() +" document project(s) found.")

}

else {

Write-Host-ForegroundColor Red -Object "ERROR: No document projects found."

Exit

}

#######################################

# {Prompt for the document connector

#######################################

if($connectors -ne $null)

{

Write-Host-ForegroundColor Yellow -Object "Select a document project:"

for ($i=0; $i-lt$connectors.Length; $i++)

{

$connector=$connectors[$i]

Write-Host-Object $i,"-",$connector.Name,"-",$connector.ProjectType

}

Write-Host-Object "x - Exit"

Write-Host

do

{

$result=Read-Host-Prompt ("Select 0-"+ ($connectors.Length-1) +" or x")

if($result-eq"x")

{

Exit

}

if(($result-match"^\d+$") -and ([int]$result-ge0) -and ([int]$result-lt$connectors.Length))

{

$connector=$connectors[$result]

Break

}

}

while($true)

#######################################

# Get mailboxes

#######################################

$mailboxes=$null

$MailboxesWithErrors=@()

$MailboxErrorCount=0

$ExportMailboxList=@()

Write-Host

Write-Host-Object ("Retrieving mailboxes for '$($connector.Name)':")

Try{

$mailboxes=@(Get-MW_Mailbox-Ticket $mwTicket-ConnectorId $connector.Id-RetrieveAll -ErrorAction Stop)

}

Catch{

Write-Host-ForegroundColor Red "ERROR: Failed to query users in project '$($connector.Name)'"

Exit

}

Foreach ($mailboxin$mailboxes){

$LastMigration=get-MW_MailboxMigration-ticket $mwTicket-MailboxID $mailbox.id|? {$_.Type-ne"Verification"} |Sort-Object-Property Startdate -Descending |select-object-First 1

if ($LastMigration.Status-eq"Completed"){

try{

$MailboxErrors=get-mw_mailboxerror-ticket $mwTicket-mailboxid $mailbox.id-severity Error -erroraction Stop

}

Catch{

Write-Host-ForegroundColor Yellow "WARNING: Cannot find errors for mailbox '$($mailbox.ExportEmailAddress)'"

}

if (-not ([string]::IsNullOrEmpty($MailboxErrors))){

$MailboxesWithErrors+=$mailbox

$MailboxErrorCount=$MailboxErrorCount+$MailboxErrors.count

}

}

}

if($MailboxesWithErrors-ne$null-and$MailboxesWithErrors.Length-ge1)

{

Write-Host-ForegroundColor Green -Object ("SUCCESS: "+$MailboxesWithErrors.Length.ToString() +" mailbox(es) elegible to retry errors found")

Write-Host-ForegroundColor Green -Object ("SUCCESS: '$($MailboxErrorCount)' individual errors found that will be retried")

$RetryMigrationsSuccess=0

Foreach ($mailboxwitherrorsin$MailboxesWithErrors){

try{

$RecountErrors=get-mw_mailboxerror-ticket $mwTicket-mailboxid $mailboxwitherrors.id-severity Error -erroraction Stop

$result=Add-MW_MailboxMigration-ticket $mwTicket-mailboxid $mailboxwitherrors.id-type Repair -ConnectorId $connector.id-userid $mwTicket.userid-ErrorAction Stop

write-host-ForegroundColor Green "INFO: Processing $($mailboxwitherrors.ExportEmailAddress) with $($RecountErrors.count) errors"

$ErrorLine=New-Object PSCustomObject

$ErrorLine|Add-Member-Type NoteProperty -Name MailboxID -Value $mailboxwitherrors.id

$ErrorLine|Add-Member-Type NoteProperty -Name "Source Address"-Value $mailboxwitherrors.ExportEmailAddress

$ErrorLine|Add-Member-Type NoteProperty -Name "Destination Address"-Value $mailboxwitherrors.ImportEmailAddress

$ErrorLine|Add-Member-Type NoteProperty -Name "Error Count"-Value $RecountErrors.count

$ExportMailboxList+=$ErrorLine

$RetryMigrationsSuccess=$RetryMigrationsSuccess+1

}

Catch{

Write-Host-ForegroundColor Red "ERROR: Failed to process $($mailboxwitherrors.ExportEmailAddress). Error details: $($Error[0].Exception.Message)"

}

}

if ($RetryMigrationsSuccess-ge1){

Write-Host-ForegroundColor Yellow "INFO: $($RetryMigrationsSuccess) retry migrations executed. Exporting List to CSV."

$ExportMailboxList|Export-CSV .\List-UsersWithErrors.csv -NoTypeInformation

}

Else{

Write-Host-ForegroundColor Yellow "INFO: No retry migration passes were executed with success."

}

}

else

{

Write-Host-ForegroundColor Yellow "INFO: no users in project '$($connector.Name)' qualify for a retry errors pass. Make sure the users are in a completed state and have individual item errors logged."

Exit

}

}
This is the link for my GitHub Gist, where all comments are welcomed regarding the code. Use the comment section as well if you want something changed.
You can find all my BitTitan SDK scripts in my GitHub repository.

BitTitan PowerShell Tips: How to connect the BitTitan SDK to the German instance

As many of you might know, the BitTitan SaaS has multiple instances across the globe, such as:

If you’re using the BitTitan SDK, to automate most, if not all of your project tasks, keep in mind the following:

  • By default, the BitTitan SDK connects to the global instance
  • There is no specific version of the SDK to connect to a different instance
  • There are 2 cmdlets that allow you to connect to the German instance:
    • Set-BT_Environment -Environment Germany
    • Set-MW_Environment -Environment Germany
  • You need to run the cmdlets above before you create the BitTitan PowerShell ticket

The BitTitan SDK interacts with both our MSPC platform – for tasks such as managing customers, endpoints, DeploymentPro, etc – and with our MigrationWiz platform, to manage your migration projects among many other things. Depending on the platform you want to interact with, you’ll need to run one of the commands above, or both. The “BT” commands applies to MSPC and the “MW” command applies to MigrationWiz.

See below the sample code screenshot.

BTSDK1

On a side note, if you’re wondering what a BitTitan PowerShell ticket is (mentioned multiple times in this blog post), all of the BitTitan cmdlets are backed by a ticket, that determines which environment we’re connecting into (MSPC or MigrationWiz), which workgroup/account and has the credentials to access it.

For much more information on how to code with the BitTitan SDK, go here or ping me an email via the blog contact form.

No Outlook 2007 in Exchange Online. Be prepared with BitTitan HealthCheck for O365

I just wrote yesterday a blog post about the dead of RPC over HTTP in Exchange Online, and how that terminates Outlook 2007 as a functioning version to connect to the cloud Exchange.

In that article I briefly talked about how you can use the Exchange PowerShell and mailbox audit logging to determine the version of Outlook your users have, but that has some limitations, such as:

  • If you’re moving to 365, from a non Exchange system, or one previous to Exchange 2010, you won’t have mailbox audit logging.
  • Mailbox Audit logging is off by default and in Exchange on premises systems that are very low on resources (hence the possible move to Exchange Online), it’s something that some Exchange administrators might be reluctant to turn on (although the truth is the load is minimal).
  • The report is extensive and includes all connectivity that each user did to Exchange. Identifying the computer with the outdated Outlook in some cases might be tricky (users that have roaming profiles and log into multiple computers).

So in summary, if you are assessing your users mail clients as part of a migration or if your users use multiple workstations, the approach above is not ideal.

That being said, the solution for you is the free BitTitan HealthCheck for Office 365 module, that is part of the BitTitan Device Management Agent software.

From a technical perspective, once the DMA agent is deployed (via email or automated process such as Group Policy), the HealthCheck for Azure module will run a full assessment to the machine. It will provide much more information than just Outlook, such as:

  • Operating System
  • Disk Space, CPU and memory
  • Internet download and upload speed
  • Device specifications
  • Browsers and Outlook versions

As you can see you’ll get a very complete report and it doesn’t require any license.

As a final note the Device Management Agent also has the DeploymentPro module, that you can use to automatically reconfigure the Outlook profile, as part of your migration.