Microsoft Azure Tip: How to assign a static IP address to your Azure VM

This blog post will quickly show you how you can assign a static IP address to one of yours Microsoft Azure Virtual Machines, using the Microsoft Azure Powershell.

Assuming that you have already created at least one virtual machine, on your Azure subscription, the first thing you need to know and do is, how to install and configure the Azure Powershell.

On the article from the above link, you can follow the instructions to install the Microsoft Azure Powershell and to connect it to your Azure subscription.

Now let’s login to the Microsoft Azure Management Portal, and start by looking at the Virtual Networks.

Network-VM-1

I created a virtual network on my subscription, named “vlan192”, and as you can see the virtual machine “DC01” got the IP address 192.168.0.4 assigned, which is part of a sub. Now I will change that IP address to one of my choosing.

Network-Subnets-2

Above you can see the virtual network in more detail. Before assigning a static IP address to your virtual machine, make sure the address you choose is within the usable address range of one of the subnets of your virtual network. My virtual network has two subnets.

One other thing that you need to take into account, is that when you create the Vitual Machine, you need to make sure that you assign the correct virtual network and subnet to it, as shown below:

Network-createVM-3

You can always go to the Dashboard of the virtual network, and make sure that the Virtual Machine you created is listed there, and what subnet is the virtual machine using.

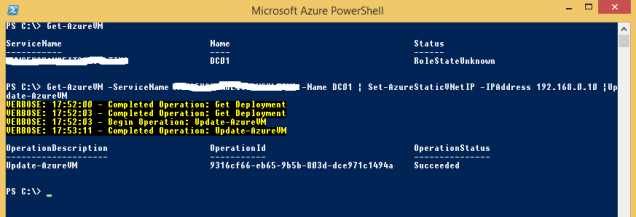
We can now connect to the Microsoft Azure Powershell and set the static IP. Let’s start by running the following cmdlet to see the details of the existing virtual machines:

Get-AzureVM

The cmdlet above will give you the servicename and the virtual machine name that you need to run the cmdlet that sets the static IP:

Get-AzureVM -ServiceName <ServiceName> -Name <VMName>  | Set-AzureStaticVNetIP -IPAddress <StaticIP> | Update-AzureVM

Below you can see the output of the cmdlet.

Network-changeIP-4

And finally if you go to the properties of the virtual machine, on the Azure Management Portal, you can see that the static IP is set.

Network-checkIP-5

IMPORTANT NOTE:

You need to be aware is that the IP above is assigned to the specific VM. A reservation is made and therefore that will be the IP of the virtual machine as long as the reservation is kept. This does not change the network properties at the OS level. It doesn´t set the static IP there. You should now login to the virtual machine and set the static IP to match the reservation, as you are now sure that it won’t cause any IP address conflict.

Office 365 tips: Automatic DNS records creation when your custom domain is hosted with GoDaddy

Last week I started another Office 365 project. The custom domain to validate is hosted with GoDaddy, so once more I took advantage of the excellent integration feature between Office 365 and GoDaddy.

This feature is not new, but it’s very good and therefore always worth blogging about it.

Click here to see the official statement from Microsoft, about this integration, and a demo video.

Now a quick walkthrough. My domain was already validated, but you can use the integration also for the domain validation, as it creates the necessary DNS record.

After the domain is validated and you set the domain purpose, the Office 365 Admin portal detects that your domain provider is 365, and you can then click on “Add Records” to add your DNS records.

1

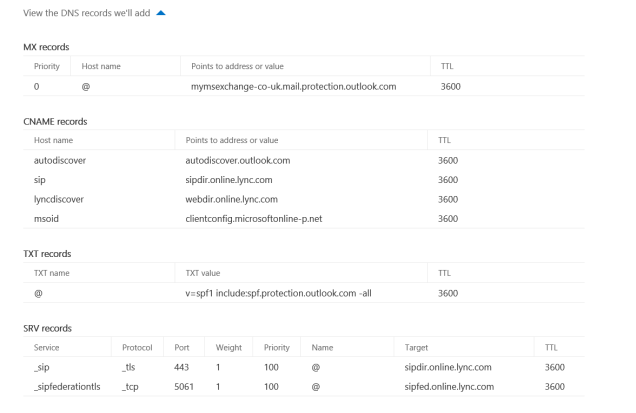
Before adding them, you can see the detail by expanding “View the DNS records we’ll add”.

2

A GoDaddy logon window will pop up. Enter your username and password.

3

Click confirm to accept the changes on your public DNS zone.

(Note: Apologies about the Portuguese screenshoots)

4

You will then get the confirmation that the changes were done.

5

And if you login to your GoDaddy account and edit the zone file for your domain, you will see all the new DNS records there.

6

That’s it. As simples as that! Enjoy!

Office 365: How to enable federation on your Lync Online Organization

Have you just started using Lync on Office 365, and when trying to federate with someone on another company, or when they try and federate with you, all you/they see is “Presence Unknown”? Continue reading through all the steps to enable federation on your Lync Online Organization.

The first thing you need to do, is to make sure that all the necessary DNS records are in place. Go to your Office 365 Admin Portal, click on Domains or the left hand side, and you will see all of your domains. Lync uses the UserPrincipalName of the user to set the SIP address, which means that your SIP domain will be the one used for the UPN also (and btw it should also match your primary e-mail address). Select the domain and click on “Manage DNS”.

1-1

Make sure the domain purpose is set for Lync Online.

1-2

Make sure all the Lync Online DNS records are created on your public DNS zone. You can check which records you need to create also on the Manage DNS section.

3

Now let’s have a quick look to see if the records are in place. We will check specifically the SIP federation SRV record, but i recommend you check them all. Open a command prompt and run:

nslookup -q=SRV _sipfederationtls._tcp.yourdomain.com

1-3

As you can see it points to sipfed.online.lync.com

Now that we know that all the DNS records are in place, go to your Office 365 admin portal and click on “Admin > Lync”

4

Why is this a required step?

Because the Lync Online Federation comes DISABLED by default

To enable it, on the Lync Online Admin Center, click on “Organization” and on the right hand side, click on the “External Communications” tab.

1

You will see that the external access is defined to “Off completely”. Change it to “On except for blocked domains” or “On only for allowed domains”. You can also turn on or off the public IM connectivity, and below you can define all the domains to allow or block.

2

And that’s it, job done. Don’t forget if you just enabled your Lync online tenant you need to allow federation, as it comes disabled by default. And make sure the DNS records are in place!