Office 365: Script to export to CSV mailboxes without the onmicrosoft.com smtp address

Just recently and when helping drive a Google Suite to Office 365 e-mail migration, I was faced with a problem that affected my mail routing capabilities between the 2 systems: Not all mailboxes in Office 365 had the @tenantid.onmicrosoft.com domain.

Now that can be a problem, specifically because in many coexistence scenarios (including the one I mentioned above), that “tenant.onmicrosoft.com” or the “tenant.mail.onmicrosoft.com” address is used as the forwarding address on the e-mail system coexisting with Office 365.

Here are a couple of articles describing cases where the service or mail routing domain were missing:

“Target mailbox doesn’t have an SMTP proxy matching ‘.mail.onmicrosoft.com'” error when you try to move mailboxes to Exchange Online

User@Domain.onmicrosoft.com disappeared

The main problem in this cases is that you can find that some users don’t have that address, as an additional smtp address, the hard way, which basically is getting an NDR on the source system when it tries to forward that email to Office 365. So to be on the safe side, and because this happened to me a few times, I decided to create a script that identifies all users that don’t have an address from a specific email domain.

Some bullet point instructions for the script:

  • you can download the script here
  • The file you downloaded contains 2 scripts: Export-UsersNoOnMicrosoftAddress.ps1 and Log_Functions.ps1. Copy both into the same folder
  • Open a PowerShell window and run .\Export-UsersNoOnMicrosoftAddress.ps1
  • The script will prompt you to enter your Office 365 credentials
  • The script will prompt you for an email domain (i.e tenant.onmicrosoft.com)
  • All users that don’t have an address with that email domain will be exported to a file called UsersNoOnmicrosoftAddress.csv located in the same folder
  • A log file called ExportUsersOnmicrosoft.log is also created in the same folder, where you can check for any errors after running the script

See screenshot below with the output of the script on the console:

UsersNoOnmicrosoft1

Of course that, if you look at the code, you will easily realize that the script can export users that don’t have an address from any domain you chose. That being said use it as you see fit. To me it helped me a lot on detecting the users with the problem described above.

Just a quick note before I finish this post: there are 2 reasons for this script not to fix the problem, adding those addresses:

  1. AD Connect: blocks you from adding the addresses directly in 365, meaning you will need to resolve the problem on premises and force a sync of the new addresses to 365
  2. Email address policies: it’s ultimately the best way of resolving email address problems in bulk, so that’s the route you so use

As always if you have any questions let me know. Enjoy.
Office 365: Some quick notes on the end of support for Dirsync and Azure AD Sync

Earlier this week Microsoft announced the end of support for the legacy Microsoft Dirsync and Microsoft Azure AD Sync tools. Millions of customers out there use one of those two tools, or the new Microsoft Azure AD Connect, to sync their users, groups, passwords, etc, from their On-Premises Active Directory to the Azure AD.

After quite a few name changes, it looks like the Azure AD Connect major version is here to stay, and now it’s time to end support to the two older major versions, and make sure that all of them are updated and replaced with the AD Connect.

If you haven’t done it already, it’s time to read the Microsoft announcement, and to start planning that upgrade.

Now let’s take the key points of the Microsoft announcement:

  • In April 13th 2016 Microsoft announced the deprecation of both Dirsync and Azure AD Sync
  • The end of support for both versions of the sync tool was planned to be April 13th 2017. That date is now official with the announcement this week and in that day the official support to those tools is gone
  • Azure AD will stop accepting connections from both tools in December 31st 2017

The most relevant thing to take into account is that, either you upgrade those instances, or they will stop working by the end of this year.

Now that you are probably more than convinced to update your instance(s) for your customers or your infrastructure, let’s bullet point some thoughts to have into account when planning the upgrade:

  • Make sure you read the official Microsoft document to upgrade Dirsync to Azure AD Connect
  • Or make sure you read the official Microsoft document to upgrade Azure AD Sync to Azure AD Connect
  • You can only do in place upgrade from Azure AD Sync to AD Connect or from an old to a more recent version of AD Connect. In place upgrades from Dirsync are not supported
  • Microsoft describes the migration done with a parallel server, to replace the existing, as “Swing migration”
  • On a standard Dirsync or AD Sync instance, there’s nothing that you need to backup and restore in the new version. The new Azure AD Connect instance will do a fresh full sync after the installation. That full sync will bring all data from the local and the Azure AD. Replacing a Dirsync or an AD Sync instance should not require restoring data
  • The only exception to the above statement is when you have some type of filtering. Filtering can be done at the AD OU, Domain or attribute level. In those cases you need to make sure you replicate the filtering you have in place, into the new instance.
  • To learn more about Dirsync filtering click here.
  • To learn more about AD Sync and AD Connect filtering click here.
  • If you are not doing an in place upgrade, you need to be aware that the “downtime” on your sync instance has impact in creating new account and replicating changes to the existing ones (that includes password changes, if you have password sync enabled)

And that’s it. As simple as that. Start downloading the AD Connect version and it’s upgrade time! 🙂

Let me know if you have questions.

Office 365: Outbound conditional (per source domain) mail flow routing

Imagine this scenario: You have an anti-spam appliance in front of your Office 365 tenant, and you want outbound mail flow from your tenant to go via that appliance, but depending on what the email domain of the sender is. For example you have domainA.com and domainB.com as two vanity domains in Office 365, and you want User1@domainA.com outbound email to go via the mail appliance, but user2@domainB.com outbound email to go direct to the Internet.

The scenario above requires conditional routing, meaning the outbound mail flow path will be different depending on what the email domain of the source user (the sender) is. The example above is just one of several that might lead you to apply such configuration.

Now the important part: How do you configure it? Well, you can do it via PowerShell or via the UI, and to do the configuration you will need the following:

  • A Transport Rule
  • An Outbound Connector

Create the Outbound Connector

The first thing you need to create is the Outbound connector.

Via Exchange Online PowerShell

To create the connector via the PowerShell, connect to Exchange Online and run the following:

New-OutboundConnector -Name “To Internet Direct” -ConnectorType Partner -UseMXRecord $true -IsTransportRuleScoped $true

The command above creates a connector that goes directly to the Internet and it’s scoped to the transport rule we will create next. If you want to create a connector that goes via an appliance run the following:

New-OutboundConnector -Name “To Internet via Appliance” -ConnectorType Partner -UseMXRecord $false -SmartHosts <Appliance IP> -IsTransportRuleScoped $true

Via the Exchange Online Admin Center

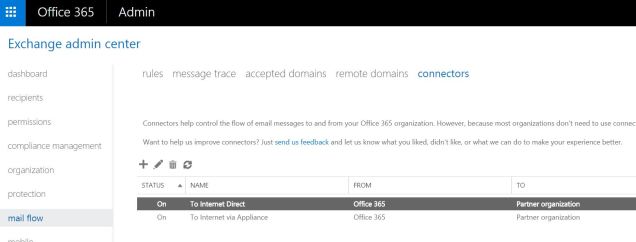
Navigate to Mail Flow > Connectors and click “+”

1

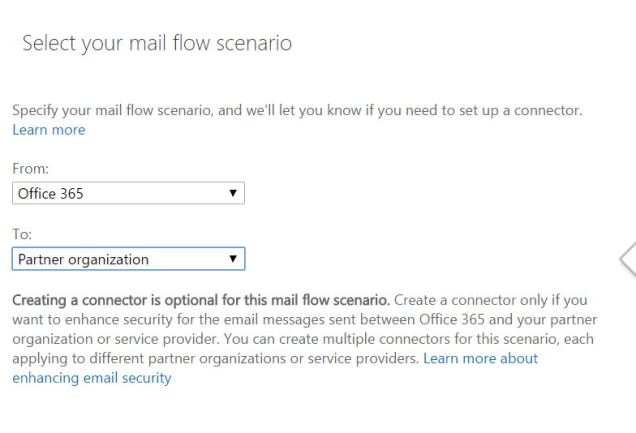
Select Office 365 as source and Partner Organization as destination

2

Enter a name and description

3

Select “Only when I have a transport rule set up that redirects messages to this”

4

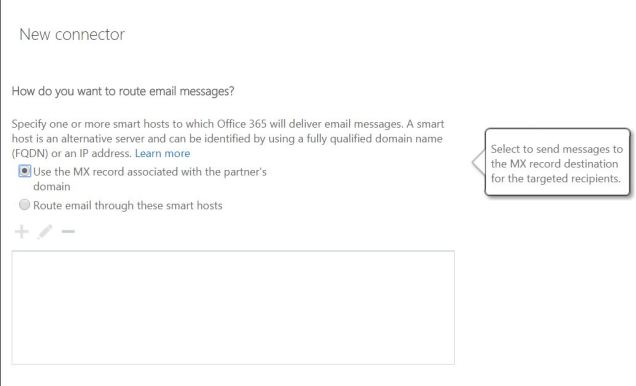
Select “Use MX Record” or “route email through these smart hosts” depending on if you want the email to go direct or via an appliance/smart host

5

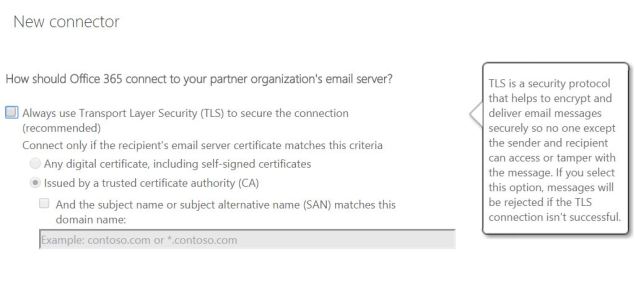
Remove the always use TLS selection, unless the appliance or server your sending the email to is configured to use TLS

6

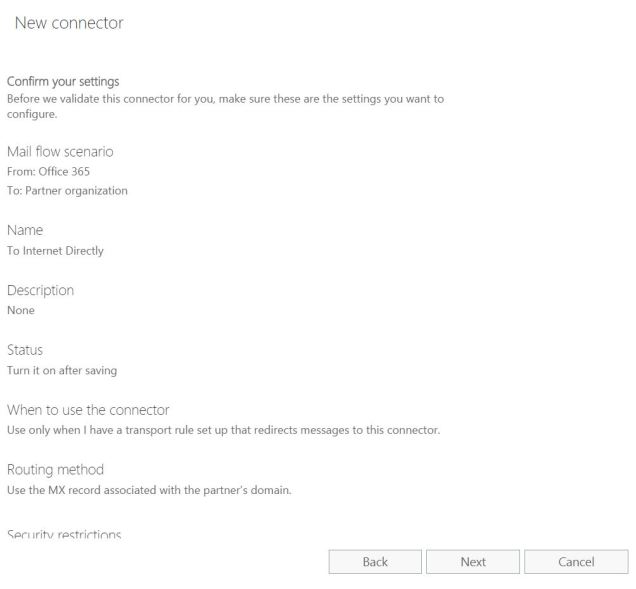
Confirm the settings and click next

7

Validate the connector and save

Create the transport rule

Once you have the outbound connector created, you can now create the transport rule.

Via Exchange Online PowerShell

To create the transport rule via the PowerShell, connect to Exchange Online and run the following:

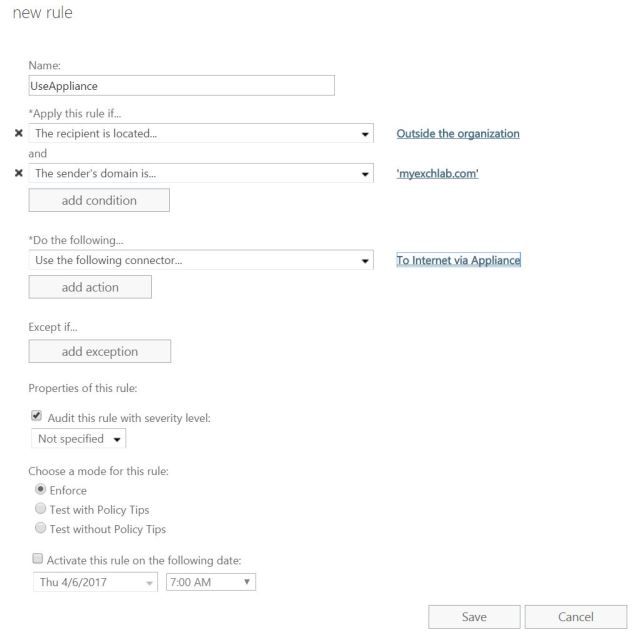
New-TransportRule -Name “UseAppliance” -SenderDomain <Source Domain> -SentToScope NotInOrganization -RouteMessageOutboundConnector “To Internet Via Appliance”

The command above creates a transport rule, that uses the “To Internet Via appliance outbound connector, and that applies when the source domain is specific and the destination recipient is outside of the organization (very important setting).

Via the Exchange Online Admin Center

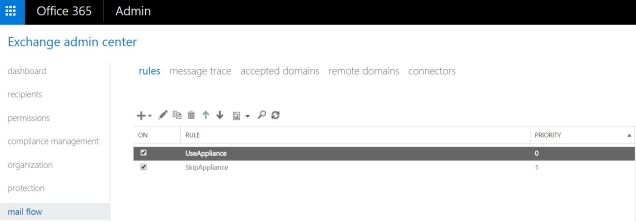
Navigate to Mail Flow > Rules and click “+ Create a New rule”

8

Click on more options

Give the rule a name

In the Conditions select “Apply this rule if..” > The recipient is located > Outside of the Organization

Click in Add Condition

Select “Apply this rule if..” > The Sender > Domain is > Enter the domain name of the source user

In the “Do the Following…” section select “Redirect the message to..” > The following connector. Select the outbound connector from the drop down list

Make sure the enforce rule option is selected

9

Now that you have both the transport rule and the outbound connector created, lets test and see if it’s being applied.

Test the routing

The first thing you should do is simple: Send an outbound email from the user that should have conditional routing applied to his domain. Make sure the email is to an external recipient.

Once you sent the email, in the Exchange Admin Center go to Mail flow > Message trace, select the sender you want to trace the message for and click on “search”

10

Note: It might take a few minutes after you sent the message before it shows in the message trace

Once you can see the message there, double click on it to see the details

11

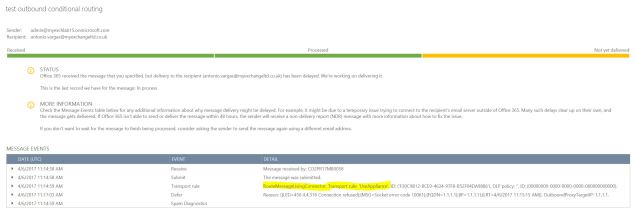
In the details you can see if the transport rule was applied and the transport rule name

13

You will also be able to see if the message was delivered, is pending or has failed. This is key for you to troubleshoot the mail flow and see if the correct rules are applied and the correct outbound connectors are being used.

And that’s it. Job done! As always if you have questions let me know.