There’s an excellent Microsoft article on TechNet that explains how to configure client-specific message size limits, in Exchange 2013.
There are a lot of good reasons to raise your client limits, as there are also a lot of reasons not to. As long as you’re aware of what your on premises Exchange Server can handle, and you’re not exposing the server to overload or degradation of the service, by raising those limits, than from my perspective, you’re fine doing it.
UPDATE: Michael de Rooij just brought to my attention an excellent script he has, that automates everything described on this post. You can read his article here and download the script here. If for some reason you still want to change it manually, continue reading the steps described below.
On this blog post we are going to change the Exchange Web Services limits. The reason behind it is simple: MigrationWiz leverages the Exchange Web Services to move data to and from your Exchange based systems (on premises or in the cloud), and the default limits on an Exchange 2013 will make the migration of every item over ~35MB fail. The solution to have those items migrated is to increase the EWS limits on your target Exchange Server.
Now let me show you what to do that.
To get the limits raised you need to edit the web.config file on both your Exchange 2013 Client Access and Mailbox Servers. The values you need to edit are:
| Serve role | Configuration file | Keys and default values | Size |
| Client Access | %ExchangeInstallPath%FrontEnd\HttpProxy\ews\web.config | maxAllowedContentLength=”67108864″ | bytes |
| Mailbox | %ExchangeInstallPath%ClientAccess\exchweb\ews\web.config | maxAllowedContentLength=”67108864″ | bytes |
| Mailbox | %ExchangeInstallPath%ClientAccess\exchweb\ews\web.config | 14 instances of maxReceivedMessageSize=”67108864″ | bytes |
In my case I will raise the limit to 200MB. Go here to convert the 200MB in bytes.
200MB = 209715200 Bytes
Let’s edit the web.config
Above you can see the path on the Client Access Server.
Search for the value to change on the CAS server, and edit it to match the 200MB.
Do the exact same change on the mailbox web.config file, on your mailbox server, or if you have both CAS and Mailbox on the same server, go to the path: %ExchangeInstallPath%ClientAccess\exchweb\ews\web.config
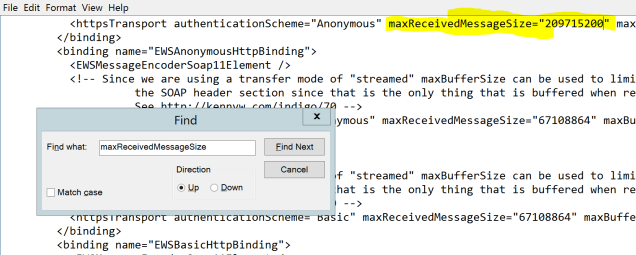
Once the maxAllowedContentLenght change is made on both web.config files, you need to change 14 instances of the maxReceivedMessageSize value, on the Mailbox Server web.config
Go to the Mailbox server web.config file location (also used on the maxAllowedContentLenght change).
Search and replace the 14 instances.
Once the changes are made, save the web.config file and do an IISReset from the command prompt.
Note: In the web.config file on Mailbox servers, there are also two instances of the value maxReceivedMessageSize=”1048576″ forUMLegacyMessageEncoderSoap11Element bindings that you don’t need to modify.
Now your on premises Exchange Server will be able to handle much larger files via EWS.


I have a script for that, let me know what you think – feedback welcomed
Excellent script Michel. Just tested it. I will update my post now, referencing your script. Thanks
Danke für den Artikel!
You’re welcome!!